Introduction
In the Modularization by using Oracle Database Containers and PDBs on Docker Engine article we discussed using a Docker image for Oracle Database to run Oracle Database 12c in a Docker container. The benefits of using Oracle Database PDBs on Docker are modularization at the database level with PDBs and modularization at the OS level with Docker. In this article we shall extend the use of the Docker containerization platform to Toad DevOps Toolkit. We would need to create two Docker containers for the two instances of Oracle Database required by Toad DevOps Toolkit. Two Docker containers may be created on the same underlying OS or on different OS. We shall use two CoreOS-based EC2 instances to run the two Docker containers. This article has the following sections.
- Setting the Environment
- Creating CoreOS-based AWS EC2 Instances for Docker
- Connecting to CoreOS-based EC2 Instances
- Downloading Docker Image
- Creating the Source Oracle Database
- Creating the Target Oracle Database
- Configuring TNSNames.ora to Connect to a PDB, not to a CDB
- Connecting to PowerShell
- Starting Toad DevOps Toolkit
- Running Install
- Running Validation Checks
- Running Compare Databases
- Running Compare Schemas
- Uninstalling the DEMO
- Stopping and Removing Docker Containers
- Stopping AWS EC2 Instances
Setting the Environment
Download and install the following software:
A local installation of Oracle Database is required to configure the net service names for the Oracle databases in tnsnames.ora so that Toad DevOps Toolkit is able to connect to the Oracle databases using the connect descriptors in tnsnames.ora. A local SQL*Plus application for the Toad DevOps ToolKit is required to run SQL and PL/SQL commands. For the local database we have used a lightweight edition of Oracle Database, the 11g Express edition, though any edition of Oracle Database 10g-12c may be used. The Oracle Database on Docker is 12c version. Set or modify the environment variables listed in Table 1.
Table 1. Environment Variables to Set or Modify
|
Environment Variable |
Value |
|
ORACLE_HOME |
C:\oraclexe\app\oracle\product\11.2.0\server |
|
TNS_ADMIN |
C:\oraclexe\app\oracle\product\11.2.0\server\network\ADMIN |
|
PATH |
C:\oraclexe\app\oracle\product\11.2.0\server\bin |
Create an AWS account, if not already registered, at https://aws.amazon.com/resources/create-account/.
Creating CoreOS Based AWS EC2 Instances for Docker
Docker may be installed on any of the supported platforms. Alternatively, a Linux platform with Docker pre-installed may be used. We have used Container Linux by CoreOS to run Docker containers for Oracle Database. Search for CoreOS on AWS Marketplace and click on Select Container Linux by CoreOS AMI as shown in Figure 1.
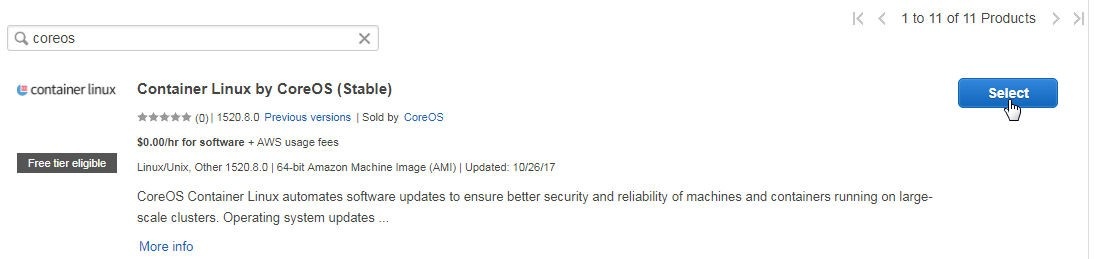
Figure 1. Selecting Container Linux by CoreOS
Choosing an instance type is significant as not just any instance type can be used to run Docker containers for Oracle Database. Typically the micro instance type is suitable for most general purpose applications, but not for Oracle Database 12c, as creating a Docker container for Oracle Database requires more memory than provided by the micro instance type. Creating a new database requires 2,048MB of memory. Use an instance with at least 4-8 GiB of memory. We have used the c3.8xlarge instance type as shown in Figure 2. Click on Next.
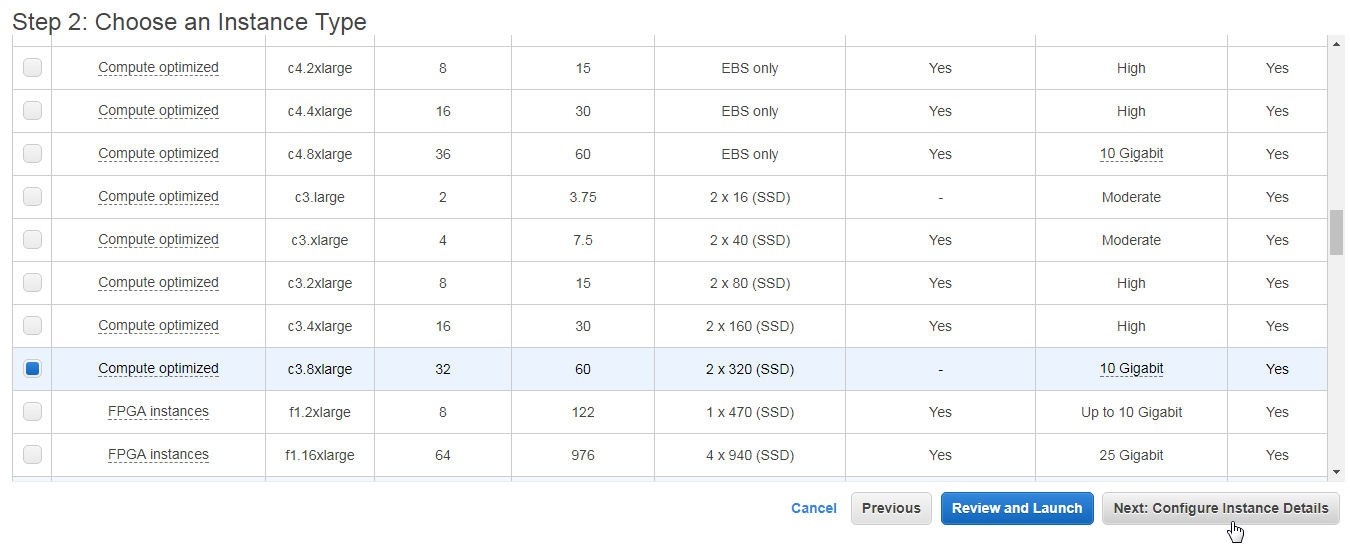
Figure 2. Selecting an Instance Type
In Configure Instance Details specify Number of Instances as 2, as shown in Figure 3. Select a VPC in the Network field and select a Subnet. For the instance type used not all availability zones may be supported. The instance used (c3.8xlarge) is not supported in availability zone us-east-1f. Select a Subnet in a supported availability zone.
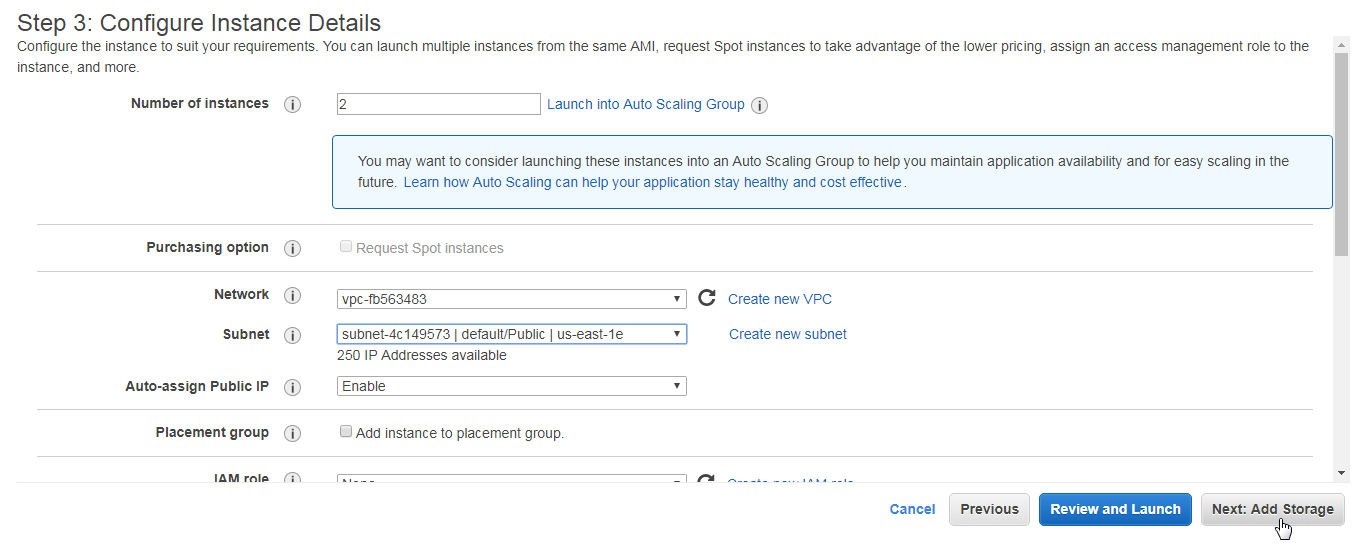
Figure 3. Configure Instance Details
If a Subnet in an availability zone not supported for the instance type used is selected, the instance fails to launch and an error message indicates which availability zones are supported for the instance type. Configuring storage is also required, as the default storage of 8 GiB for the Root volume type is not enough for the Oracle Database Docker image, which is 11GB. Set the Root volume type storage to 100 GiB as shown in Figure 4. Click on Next.
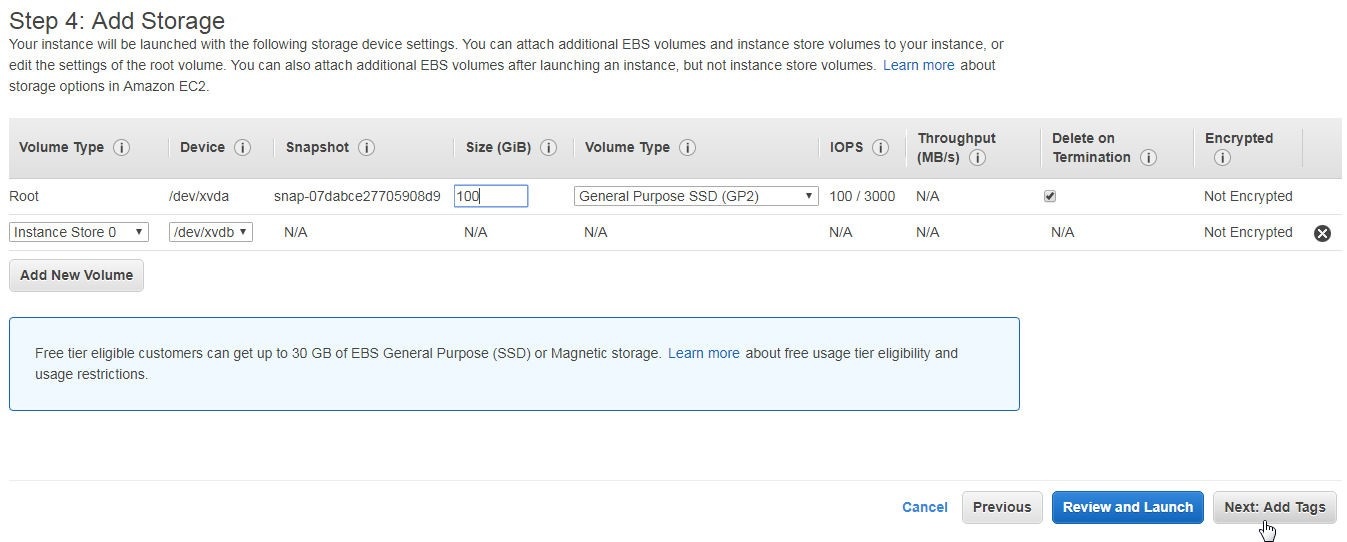
Figure 4. Adding Storage
Tags are not required to be added. Click on Next. In Configure Security Group modify the default rule setting to allow traffic from the Public IP of the machine on which Toad DevOps ToolKit is installed. If the Public IP of the machine is not known or cannot be ascertained. modify the default rule to set Type to All traffic, Protocol to All, Port Range to 0-65535, and Source to Anywhere as shown in Figure 5. Click on Next.
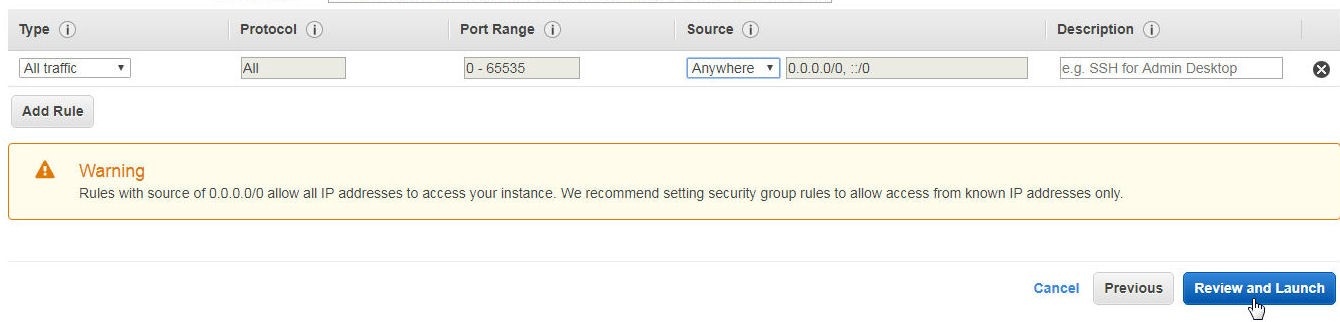
Figure 5. Setting Rule to allow All Traffic
In Review Instance Launch click on Launch as shown in Figure 6.

Figure 6. Launch
Next, select an existing key pair or create a new key pair and click on Launch Instances as shown in Figure 7.
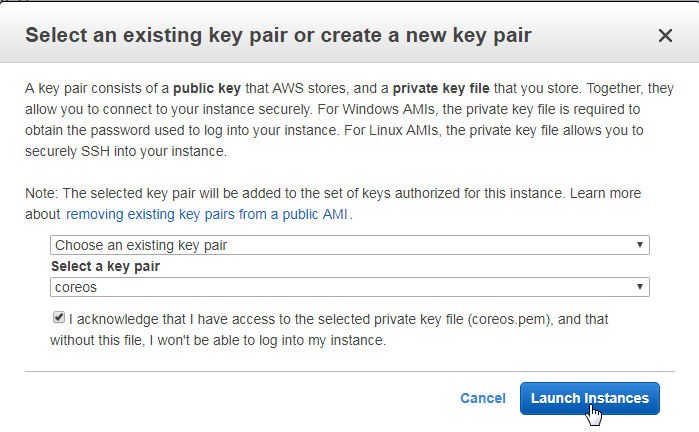
Figure 7. Selecting a Key Pair and Launching Instance
The EC2 instance starts running as shown in Figure 8. Initially the instance status checks are performed.
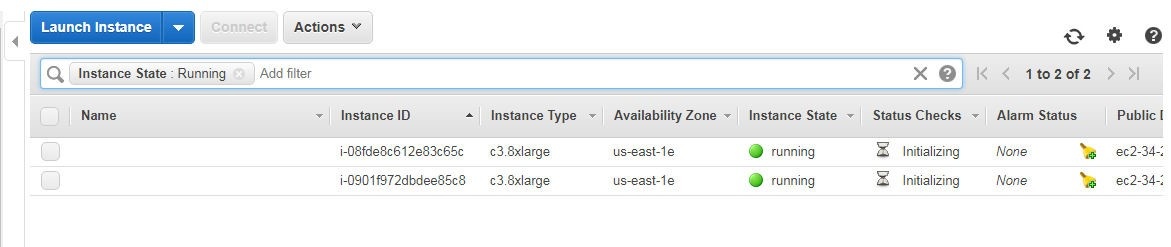
Figure 8. EC2 Instances Running
EC2 instances do not have a name assigned to them by default. Optionally specify instance names as shown in Figure 9.
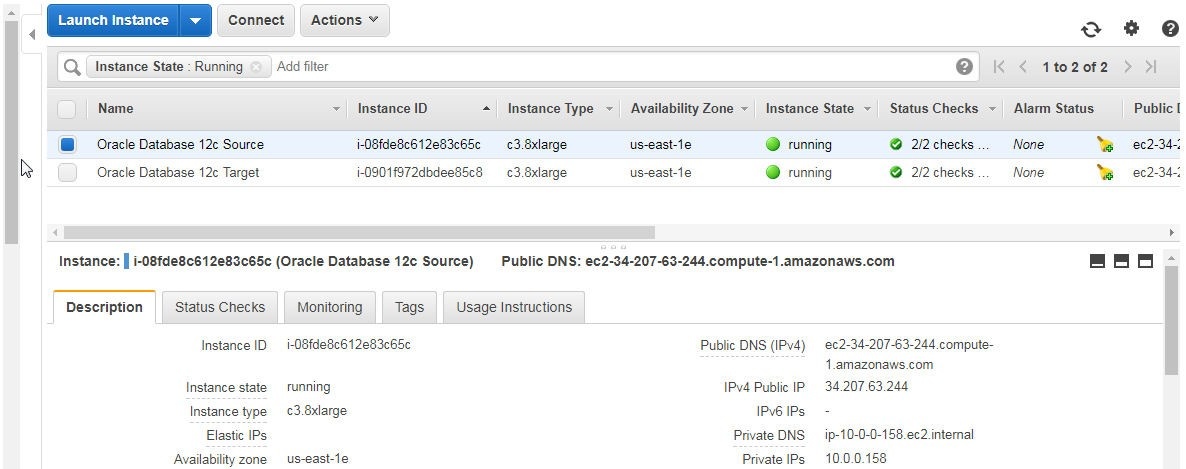
Figure 9. EC2 Instances running and with status checks completed
Connecting to CoreOS-based EC2 Instances
To run a Docker container for Oracle Database 12c on an EC2 instance requires connecting to the EC2 instance. To connect to an EC2 instance obtain the IPv4 Public IP from the EC2 Dashboard as shown in Figure 9. Using the IPv4 Public IP with user name core (for CoreOS based instances only) SSH connect using the private key with which the EC2 instance is launched.
ssh -i coreos.pem core@34.207.63.244
Specify yes at the prompt Are you sure you want to continue connecting (yes/no)? The instance gets connected to and the core@<private ip> command prompt gets displayed, as shown in Figure 10.
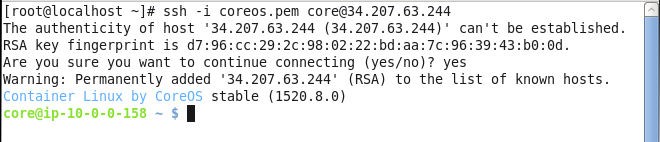
Figure 10. Connected to EC2 Instance
Similarly, SSH connect to the other EC2 instance.
ssh -i coreos.pem core@34.227.93.93
Specify yes at the prompt Are you sure you want to continue connecting (yes/no)? The second instance gets connected to, as shown in Figure 11.
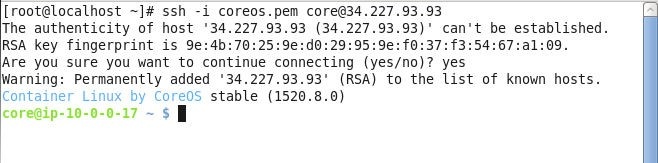
Figure 11. Connected to 2nd EC2 Instance
Downloading Docker Image
The Docker image for Oracle Database is not available pre-built and must be built by a user, as discussed in the Modularization by using Oracle Database Containers and PDBs on Docker Engine article. If the built Docker image is uploaded to a Docker repository such as the Docker image used in this article, the image would need to be downloaded before being run if it is not already available on the local machine.
It is not required to download a Docker image separately prior to running a Docker image because a Docker image gets downloaded automatically when run. However, it is a best practice to first download a Docker image so that if any storage space issue exists (such as insufficient storage space) it is known before running the Docker image. Download the Docker image for Oracle Database with the docker pull command. The Docker repository would be different for different users, as the dvohra/oracle-db:12.2.0.1-ee image is not available for general public use. First, login to the Docker repo. The command to login to Docker Hub is as follows.
sudo docker login
Specify the Username and Password when prompted, as shown in Figure 12. Subsequently download (pull) the Docker image.
sudo docker pull dvohra/oracle-db:12.2.0.1-ee
The Docker image gets downloaded, as shown in Figure 12.
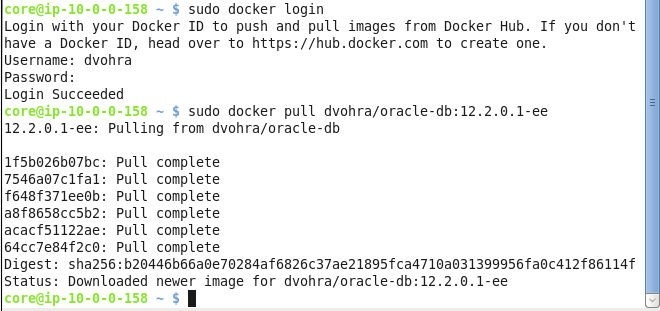
Figure 12. Downloading Docker Image
Similarly, download the Docker image on the other EC2 instance as shown in Figure 13.
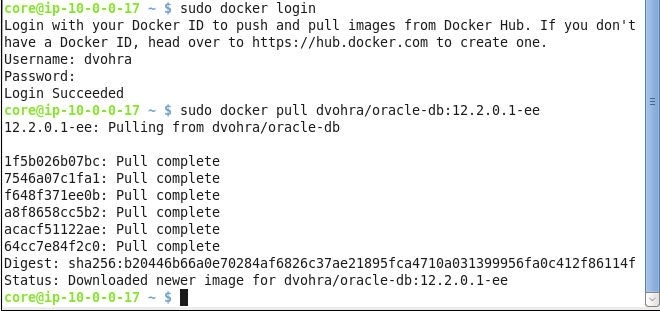
Figure 13. Downloading Docker Image on other EC2 instance
Creating the Source Oracle Database
The two Container Linux by CoreOS-based EC2 instances are identical and either of these could be used for the source database or target database. Selection of a database as source or target is made when the Toad DevOps Toolkit script is run to install the DEMO schema on the source and target databases. A new Docker container command is created with the docker run command. The docker run command for Oracle Database images should include a –p option to expose port 1521 on which Oracle Database is running in a Docker container on the host port 1521. Port 5500 is exposed for the Enterprise Manager (EM). Environment variables are set with the –e option. ORACLE_SID is for the container database (CDB) and ORACLE_PDB is for the pluggable database (PDB). The password for the SYS and SYSTEM schemas is set with the ORACLE_PWD variable. The password should include one uppercase letter, one lowercase letter and one digit. Run the following docker run command as sudo on one of the Container Linux instances.
sudo docker run --name orcl \
-p 1521:1521 -p 5500:5500 \
-e ORACLE_SID=ORCL \
-e ORACLE_PDB=ORCLPDB1 \
-e ORACLE_PWD=OrclDb12 \
dvohra/oracle-db:12.2.0.1-ee
Oracle Database 12c gets created as shown in Figure 14.
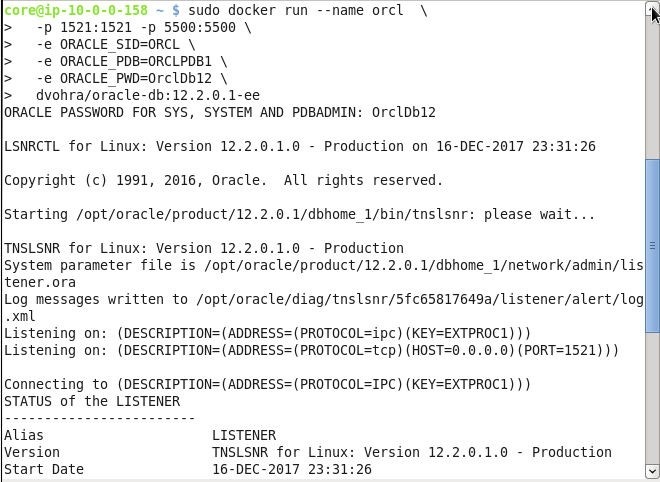
Figure 14. Running docker run Command
A more detailed output from the docker command is listed:
[root@localhost ~]# ssh -i coreos.pem core@34.207.63.244
The authenticity of host '34.207.63.244 (34.207.63.244)' can't be established.
RSA key fingerprint is d7:96:cc:29:2c:98:02:22:bd:aa:7c:96:39:43:b0:0d.
Are you sure you want to continue connecting (yes/no)? yes
Warning: Permanently added '34.207.63.244' (RSA) to the list of known hosts.
Container Linux by CoreOS stable (1520.8.0)
core@ip-10-0-0-158 ~ $ sudo docker login
Login with your Docker ID to push and pull images from Docker Hub. If you don't have a Docker ID,
    head over tohttps://hub.docker.com to create one.
Username: dvohra
Password:
Login Succeeded
core@ip-10-0-0-158 ~ $ sudo docker pull dvohra/oracle-db:12.2.0.1-ee
12.2.0.1-ee: Pulling from dvohra/oracle-db
1f5b026b07bc: Pull complete
7546a07c1fa1: Pull complete
f648f371ee0b: Pull complete
a8f8658cc5b2: Pull complete
acacf51122ae: Pull complete
64cc7e84f2c0: Pull complete
Digest: sha256:b20446b66a0e70284af6826c37ae21895fca4710a031399956fa0c412f86114f
Status: Downloaded newer image for dvohra/oracle-db:12.2.0.1-ee
core@ip-10-0-0-158 ~ $ sudo docker run --name orcl \
>   -p 1521:1521 -p 5500:5500 \
>   -e ORACLE_SID=ORCL \
>   -e ORACLE_PDB=ORCLPDB1 \
>   -e ORACLE_PWD=OrclDb12 \
>   dvohra/oracle-db:12.2.0.1-ee
ORACLE PASSWORD FOR SYS, SYSTEM AND PDBADMIN: OrclDb12
LSNRCTL for Linux: Version 12.2.0.1.0 - Production on 16-DEC-2017 23:31:26
Copyright (c) 1991, 2016, Oracle. All rights reserved.
Starting /opt/oracle/product/12.2.0.1/dbhome_1/bin/tnslsnr: please wait...
TNSLSNR for Linux: Version 12.2.0.1.0 - Production
System parameter file is /opt/oracle/product/12.2.0.1/dbhome_1/network/admin/listener.ora
Log messages written to /opt/oracle/diag/tnslsnr/5fc65817649a/listener/alert/log.xml
Listening on: (DESCRIPTION=(ADDRESS=(PROTOCOL=ipc)(KEY=EXTPROC1)))
Listening on: (DESCRIPTION=(ADDRESS=(PROTOCOL=tcp)(HOST=0.0.0.0)(PORT=1521)))

Connecting to (DESCRIPTION=(ADDRESS=(PROTOCOL=IPC)(KEY=EXTPROC1)))
STATUS of the LISTENER
------------------------
Alias                     LISTENER
Version                   TNSLSNR for Linux: Version 12.2.0.1.0 - Production
Start Date               16-DEC-2017 23:31:26
Uptime                   0 days 0 hr. 0 min. 0 sec
Trace Level               off
Security                 ON: Local OS Authentication
SNMP                     OFF
Listener Parameter File   /opt/oracle/product/12.2.0.1/dbhome_1/network/admin/listener.ora
Listener Log File         /opt/oracle/diag/tnslsnr/5fc65817649a/listener/alert/log.xml
Listening Endpoints Summary...
(DESCRIPTION=(ADDRESS=(PROTOCOL=ipc)(KEY=EXTPROC1)))
(DESCRIPTION=(ADDRESS=(PROTOCOL=tcp)(HOST=0.0.0.0)(PORT=1521)))
The listener supports no services
The command completed successfully
[WARNING] [DBT-10102] The listener configuration is not selected for the database. EM DB Express URL will not be accessible.
   CAUSE: The database should be registered with a listener in order to access the EM DB Express URL.
   ACTION: Select a listener to be registered or created with the database.
Copying database files
1% complete
13% complete
25% complete
Creating and starting Oracle instance
26% complete
30% complete
31% complete
35% complete
38% complete
39% complete
41% complete
Completing Database Creation
42% complete
43% complete
44% complete
46% complete
47% complete
50% complete
Creating Pluggable Databases
55% complete
75% complete
Executing Post Configuration Actions
100% complete
Look at the log file "/opt/oracle/cfgtoollogs/dbca/ORCL/ORCL.log" for further details.

SQL*Plus: Release 12.2.0.1.0 Production on Sat Dec 16 23:37:29 2017
Copyright (c) 1982, 2016, Oracle. All rights reserved.
Connected to:
Oracle Database 12c Enterprise Edition Release 12.2.0.1.0 - 64bit Production
SQL>
System altered.
SQL>
Pluggable database altered.
SQL> Disconnected from Oracle Database 12c Enterprise Edition Release 12.2.0.1.0 - 64bit Production
#########################
DATABASE IS READY TO USE!
#########################
The following output is now a tail of the alert.log:
Completed: alter pluggable database ORCLPDB1 open
2017-12-16T23:37:29.267661+00:00
ORCLPDB1(3):CREATE SMALLFILE TABLESPACE "USERS" LOGGING DATAFILE '/opt/oracle/oradata/ORCL/ORCLPDB1/users01.dbf'
    SIZE 5M REUSE AUTOEXTEND ON NEXT 1280K MAXSIZE UNLIMITED EXTENT MANAGEMENT LOCAL SEGMENT SPACE MANAGEMENT AUTO
ORCLPDB1(3):Completed: CREATE SMALLFILE TABLESPACE "USERS" LOGGING DATAFILE '/opt/oracle/oradata/ORCL/ORCLPDB1/users01.dbf'
    SIZE 5M REUSE AUTOEXTEND ON NEXT 1280K MAXSIZE UNLIMITED EXTENT MANAGEMENT LOCAL SEGMENT SPACE MANAGEMENT AUTO
ORCLPDB1(3):ALTER DATABASE DEFAULT TABLESPACE "USERS"
ORCLPDB1(3):Completed: ALTER DATABASE DEFAULT TABLESPACE "USERS"
2017-12-16T23:37:29.950837+00:00
ALTER SYSTEM SET control_files='/opt/oracle/oradata/ORCL/control01.ctl' SCOPE=SPFILE;
   ALTER PLUGGABLE DATABASE ORCLPDB1 SAVE STATE
Completed:   ALTER PLUGGABLE DATABASE ORCLPDB1 SAVE STATE
Subsequent to running the docker run command, list the Docker containers with the docker ps command, as shown in Figure 15. The Docker container orcl gets listed. List the Docker images with the docker images command. The Docker image for Oracle Database gets listed.
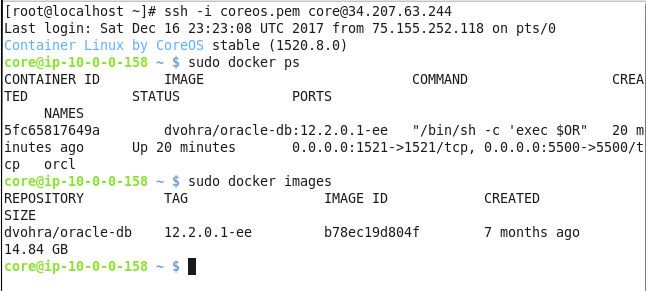
Figure 15. Listing Docker Containers and Docker Images
Creating Target Oracle Database
Run the docker run command on the other EC2 instance. The same docker run command that is run on the first EC2 instance may be run on the second EC2 instance. What differentiates Oracle Database instances on the two EC2 instances is the Public IP of the EC2 instances, which is different for different instances. The Public IP of the EC2 instance is the Host IP Address to be used for configuration in tnsnames.ora, as discussed later. If Docker containers for the two databases are created on the same Linux machine, specify different Docker container names and different ports to expose the service on the host, as well as different values for the environment variables. Using different EC2 instances is recommended, to be able to use the same docker run command.
sudo docker run --name orcl \
-p 1521:1521 -p 5500:5500 \
-e ORACLE_SID=ORCL \
-e ORACLE_PDB=ORCLPDB1 \
-e ORACLE_PWD=OrclDb12 \
dvohra/oracle-db:12.2.0.1-ee
Oracle Database gets created on the second EC2 instance , as indicated by the DATABASE IS READY TO USE message in Figure 16.
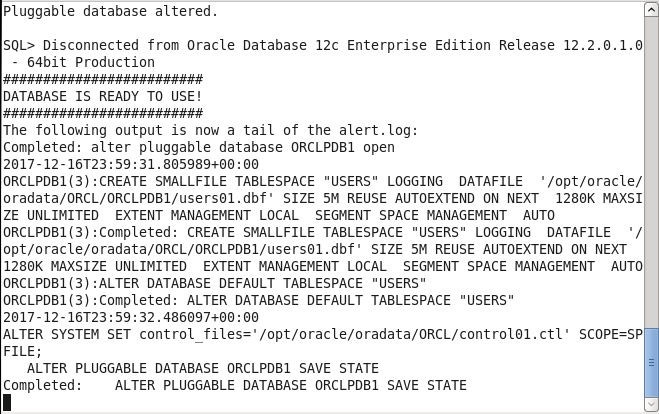
Figure 16. The 2nd database is also created
List the Docker container and Docker image on the second EC2 instance as shown in Figure 17.
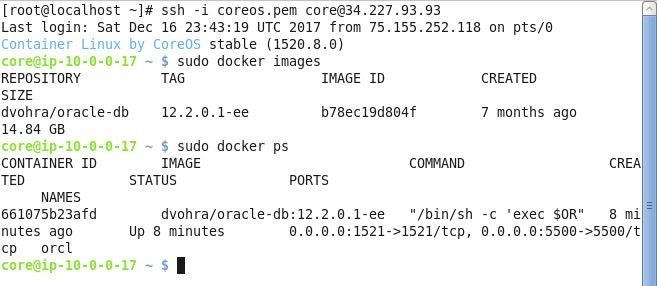
Figure 17. Listing Docker Container and Docker Image
Detailed output from docker run command for the target database is not listed, as it is the same as for the source database.
Configuring tnsnames.ora to Connect to a PDB, not to a CDB
The tnsnames.ora configuration file is used to configure the net service names that describe the connect descriptors to be used to connect to databases. The tnsnames.ora file used is specified in the TNS_ADMIN environment variable, which was set in the Setting the Environment section. Add two net service name definitions, one for the source database and the second for the target database. Obtain the Public DNS of the EC2 instance from the Dashboard as shown in Figure 18. The Public DNS is used as the HOST value in the tnsnames.ora file.
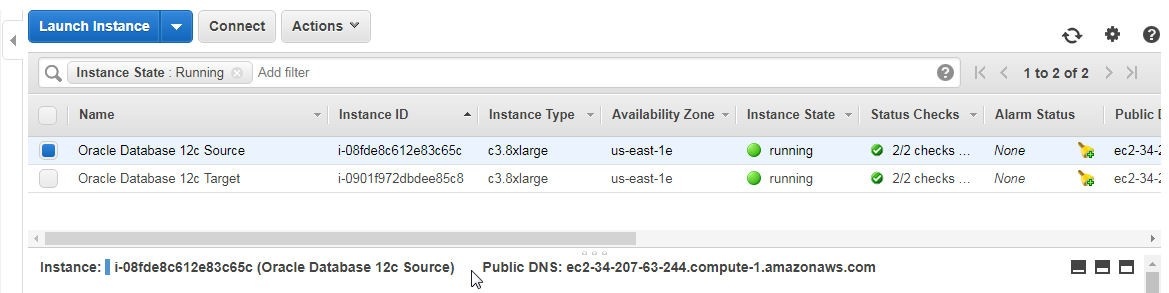
Figure 18. Obtaining the Public DNS for source database from the EC2 Dashboard
Similarly, obtain the Public DNS for the target database EC2 instance as shown in Figure 19.
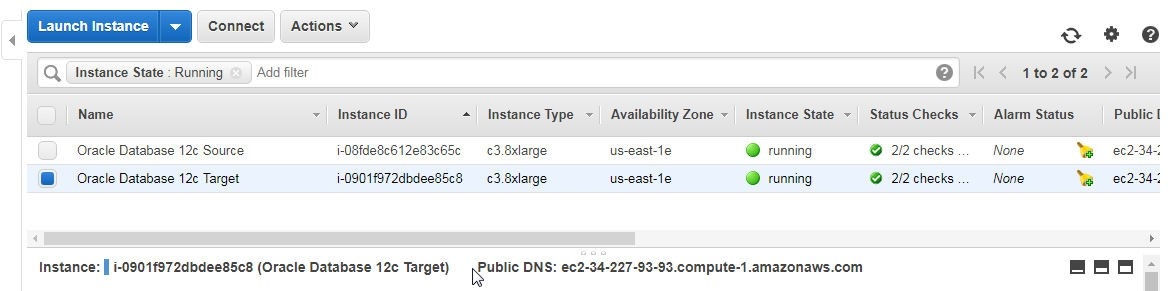
Figure 19. Obtaining the Public DNS for target database from the EC2 Dashboard
The SERVICE_NAME to be used in the tnsnames.ora file is not the ORACLE_SID value ORCL, as would seem obvious to specify. The ORACLE_SID is for the container database (CDB). The SERVICE_NAME value should be the ORACLE_PDB value (ORCLPDB1) used when creating a database. Add the following two net service names to the tnsnames.ora file.
SVC1 =
(DESCRIPTION =
   (ADDRESS = (PROTOCOL=TCP)(HOST=ec2-34-207-63-244.compute-1.amazonaws.com)(PORT=1521))
   (CONNECT_DATA=
     (SERVICE_NAME=ORCLPDB1)
   )
)

SVC2 =
(DESCRIPTION =
   (ADDRESS = (PROTOCOL = TCP)(HOST=ec2-34-227-93-93.compute-1.amazonaws.com)(PORT = 1521))
   (CONNECT_DATA =
     (SERVICE_NAME=ORCLPDB1)
   )
)
Connecting to Windows PowerShell
To connect to Windows PowerShell right-click on the application icon and select Run as administrator as shown in Figure 20.
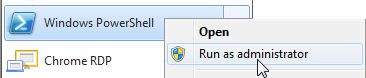
Figure 20. Launching Windows PowerShell
The Windows PowerShell gets started as shown in Figure 21.
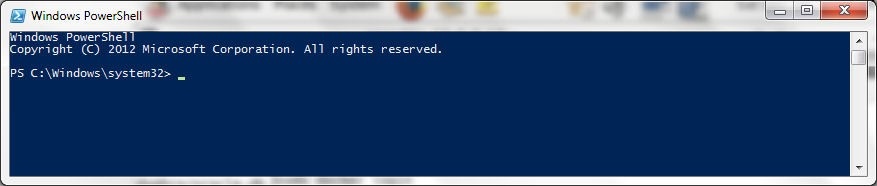
Figure 21. Windows PowerShell
Starting Toad DevOps Toolkit
Toad DevOps Toolkit (TDT) is started with the following script in PowerShell.
$TDT = New-Object -ComObject Toad.ToadAutoObject
This script creates a Toad.ToadAutoObject object which starts a TDT instance. A Toad.ToadAutoObject object need not be created again once created in a PowerShell installation.
Installing the DEMO Schema
To install the DEMO schema in the source and target databases run the PowerShell example script INSTALL with the following command. First, change directory to the PowerShell examples directory.
cd "C:\Program Files\Quest Software\Toad DevOps Toolkit\Toad DevOps Toolkit 1.0\examples\PowerShell"
./INSTALL
Specify the Login information for the Source Database when prompted as shown in Figure 22. Specify Source Database Name as SVC1, Source Database Username as SYS, and Source Database Password as the password (OrclDb12) configured in the docker run command. Similarly, specify the Login information for the Target Database when prompted as shown in Figure 22. Specify Target Database Name as SVC2, Target Database Username as SYS, and Target Database Password as the password (OrclDb12) configured in the docker runcommand. When prompted with Continue to install the DEMO schemas specify Y and click on Enter.
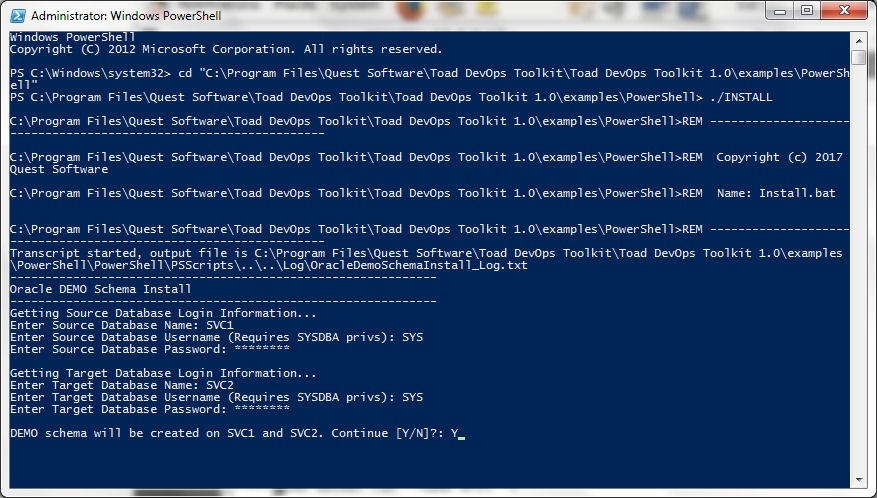
Figure 22. Specifying Login Information for Source Database and Target Database
The install.sql script starts to run and first the source database gets connected to, as shown in Figure 23. The DEMO user gets created and the required privileges get granted. The script output indicates “User created” and does not explicitly mention DEMO user but the user/schema to be created is mentioned before running the install.sql script, as shown in Figure 23.
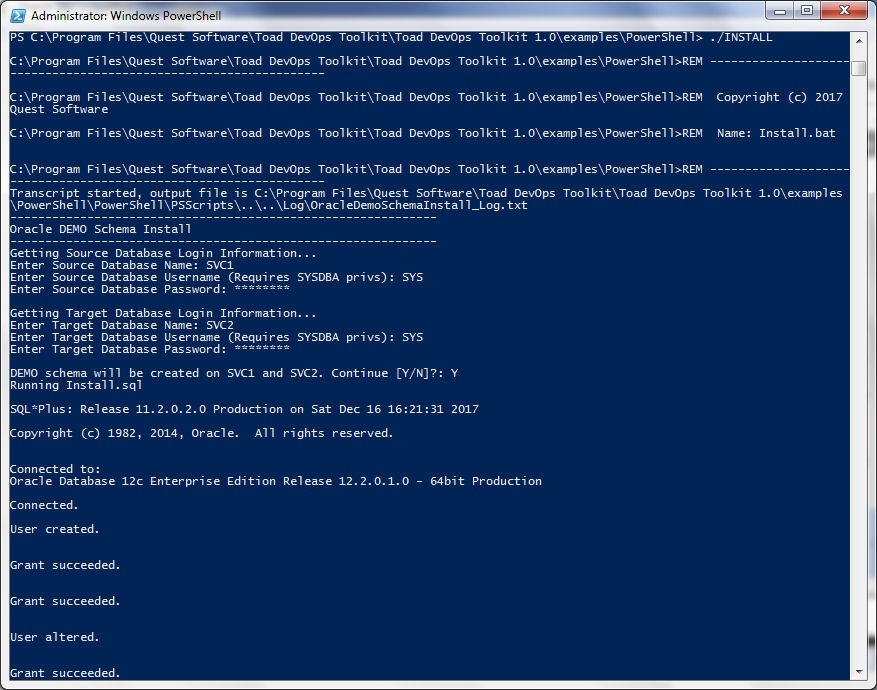
Figure 23. Running install.sql and connecting with Source Database to create DEMO User
After creating and configuring the DEMO user in the source database the install.sql script disconnects from the source database and connects with the target database to create the DEMO user in the target database and grant the required privileges. The install.sqlscript disconnects from the target database and generates a log file after it has completed, as shown in Figure 24.
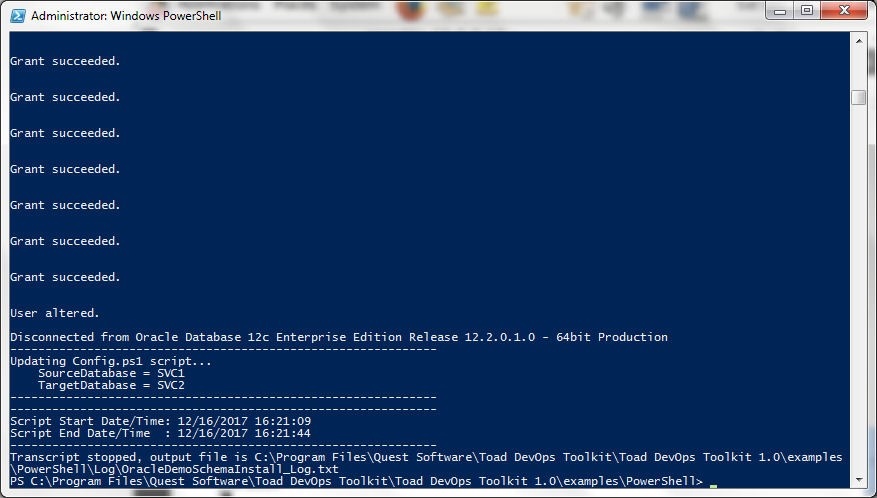
Figure 24. The PowerShell example INSTALL output
Validating Connections
The ValidationChecks PowerShell example validates that the Toad.ToadAutoObject object exists and that it is started. The ValidationChecks example batch script also connects/disconnects with the source and target databases to verify that the databases get connected to and disconnected from. The script generates a log file when completed, as shown in the output from running the ./ValidationChecks command in PowerShell in Figure 25.

Figure 25. Running the ValidationChecks PowerShell Example
Comparing Databases
To compare databases run the CompareDatabases.bat PowerShell example with the ./CompareDatabases command, as shown in Figure 26.
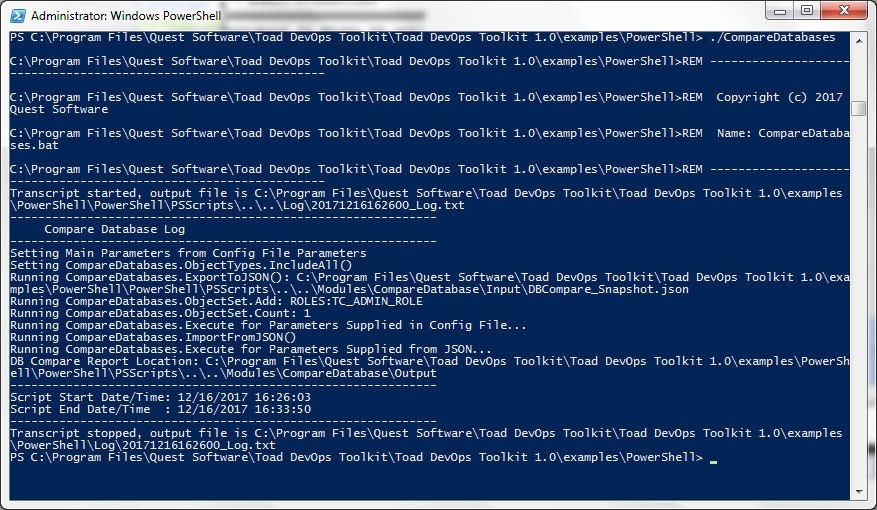
Figure 26. Running the ComapreDatabases.bat Batch Script
The script generates HTML reports enumerating the differences in the databases. A detailed report (DBCompare_DiffDetails.html) and a summary report (DBCompare_DiffSummary.html) are generated in the C:\Program Files\Quest Software\Toad DevOps Toolkit\Toad DevOps Toolkit 1.0\examples\PowerShell\Modules\CompareDatabase\Output directory, as listed in Figure 27.
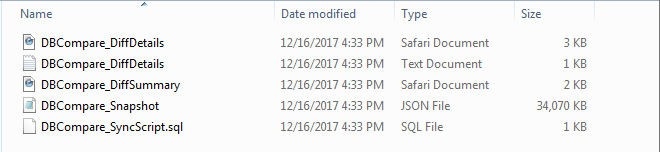
Figure 27. Listing Reports generated by ComapareDatabases Example
Open the detailed report file DBCompare_DiffDetails.html in a browser as shown in Figure 28. The detailed report includes the objects in both the source and target databases, Objects in Source only, Objects in Target only and the Extracted By information, as shown in Figure 28.
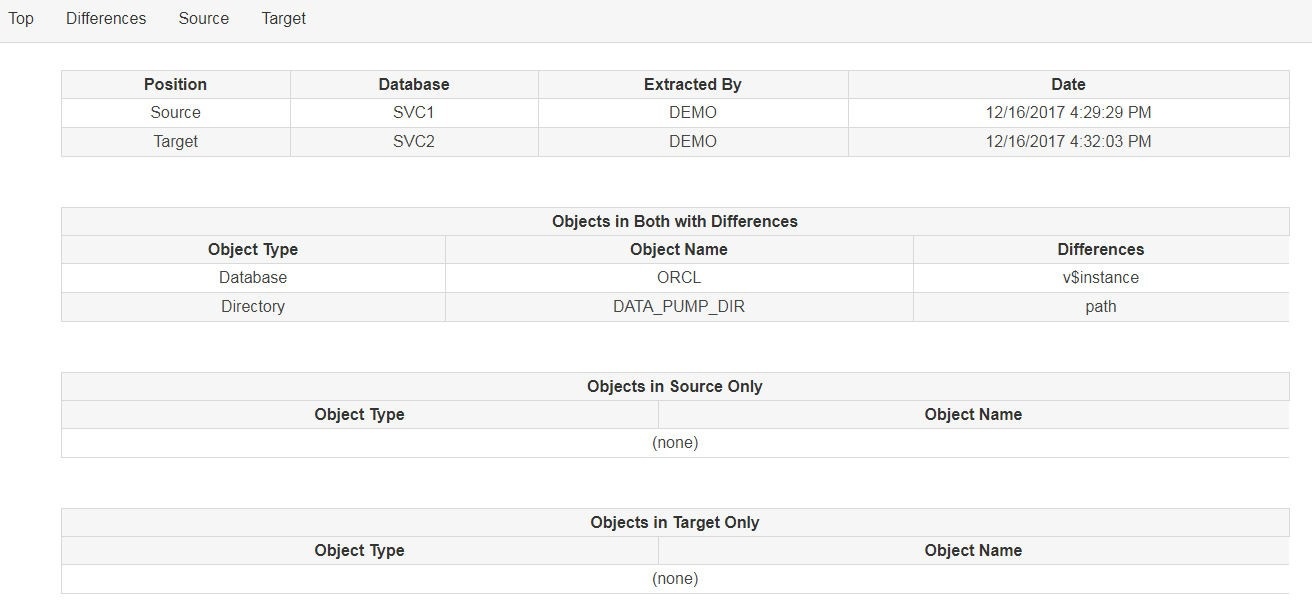
Figure 28. Detailed Report from comparing Databases
Open the summary report file DBCompare_DiffDetails.html in a browser as shown in Figure 29. The summary report includes the two databases compared and their position (Source or Target) in the comparison, the schema (DEMO) used and a timestamp of when the database was accessed for comparison. The summary report also includes the Object Types (Database, Directory) and whether they exists in Source only, Target Only or both with differences.

Figure 29. Summary report from comparing databases
Comparing Schemas
To compare the schemas in the databases run the PowerShell batch script CompareSchemas.bat with the ./CompareSchemas command as shown in Figure 30.
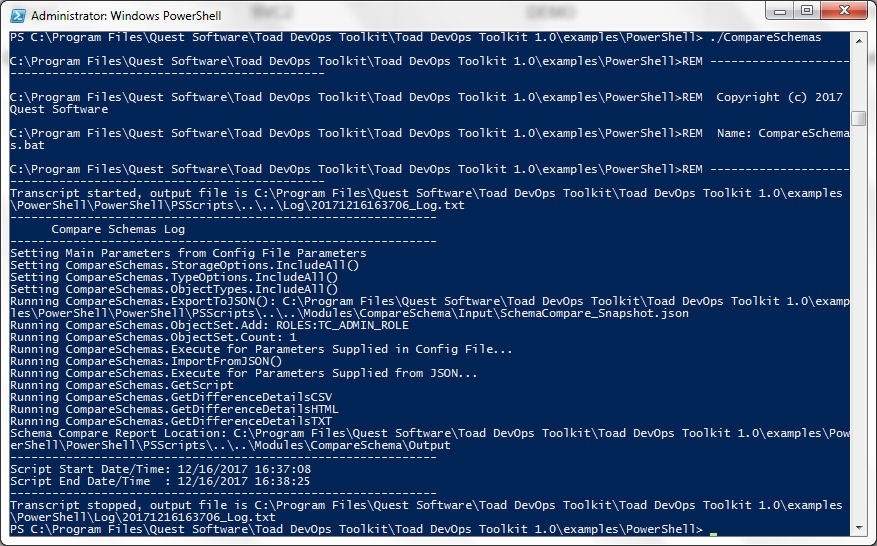
Figure 30. Running the CompareSchemas Batch Script
The comparison reports are generated in the C:\Program Files\Quest Software\Toad DevOps Toolkit\Toad DevOps Toolkit 1.0\examples\PowerShell\Modules\CompareSchema\Output directory as listed in Figure 31.
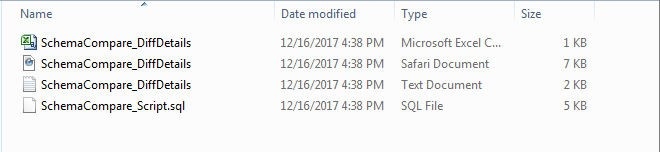
Figure 31. Listing Output Reports from comparing Schemas
The SchemaCompare_DiffDetails.csv is the Excel CSV report about the detailed differences in the schemas and is shown in Figure 32.
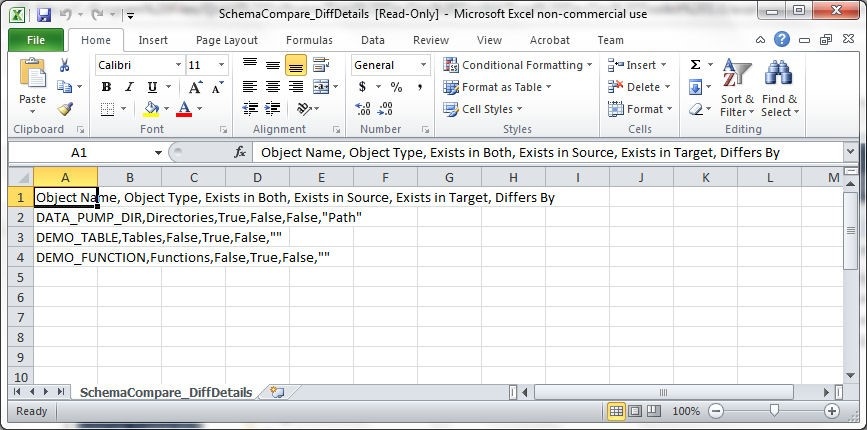
Figure 32. Excel CSV Report
The same report in HTML is generated as the SchemaCompare_DiffDetails.html file, as shown in Figure 33.

Figure 33. HTML Report for Comparing Schemas
Uninstalling the DEMO
To uninstall the DEMO schema run the ./UNINSTALL command as shown in Figure 34. When prompted for the Login information for the Source Database and Target databases SVC1 and SVC2 specify Username as SYS and Password as configured when creating the Docker container for the database. The databases get connected to and the DEMO schema gets dropped. A log file gets generated, as for all of the PowerShell examples.
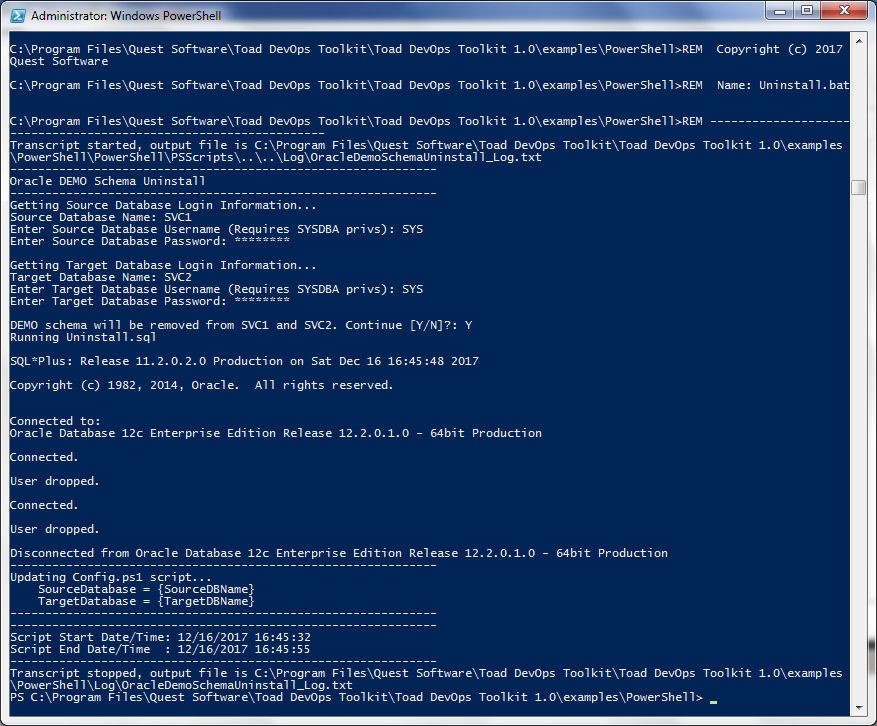
Figure 34. Running the UNINSTALL Batch Script
Stopping and Removing Docker Containers
A Docker container must be stopped before you can remove the container. Stop the Docker container in which the Source Database is running with the docker stop orcl command run as sudo, as shown in Figure 35. The command outputs the Docker container name after it has stopped the container. Subsequently, run the docker rm orcl command also as sudo to remove the container, as shown in figure 36. Running containers, which are listed with docker ps, does not list any containers.

Figure 35. Stopping and Removing a Docker Container
All Docker containers, stopped or running, are listed with the docker ps –a command, as shown in Figure 36. No containers are listed as stopped or running, as the orcl container was removed.

Figure 36. Listing All Docker Containers, stopped or running
Similarly, stop and remove the Docker container for the target database, as shown in figure 37.
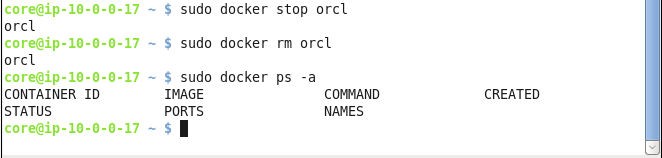
Figure 37. Stopping and removing Docker Container for Target Database
Stopping the AWS EC2 Instances
To stop the CoreOS-based EC2 instances select the instances and click on Actions>Instance State>Stop as shown in Figure 38.
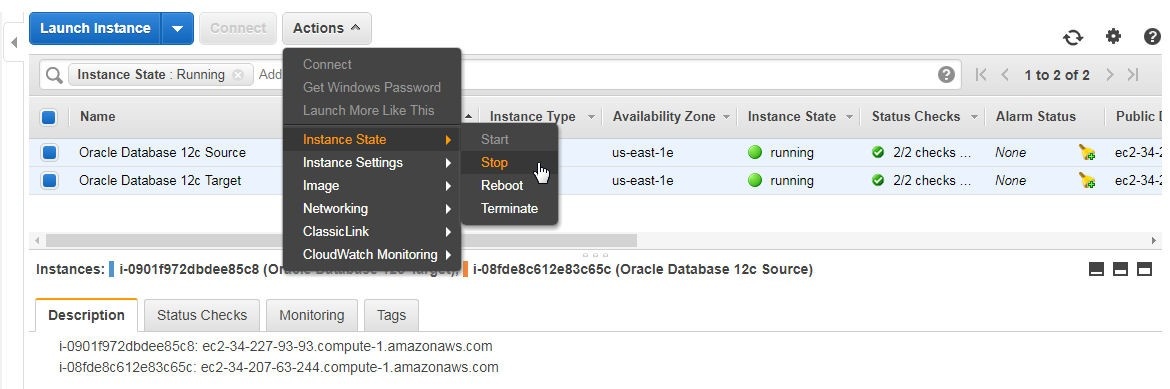
Figure 38. Actions>Instance State>Stop
In Stop Instances click on Yes, Stop. The EC2 instances begin to get stopped, as shown in Figure 39. A stopped EC2 instance may be restarted to run Docker containers and access the Oracle Databases installed. If the Docker containers are not stopped but the EC2 instances are stopped, the Docker container gets stopped automatically but is not removed. A stopped Docker container may be restarted with the docker start command.

Figure 39. Stopping EC2 Instances
Conclusion
In this article we discussed using Toad DevOps Toolkit with Oracle Database instances running on Docker. The benefits of using Docker for Oracle Database are modularization of the databases with PDBs and modularization of the OS with Docker containers. Toad DevOps Toolkit includes support for running Windows PowerShell, VBA and PL/SQL scripts for complex DevOps evaluations and workflows on databases.
Start the discussion at forums.toadworld.com