In this article series, we are looking at the steps for setting up the Oracle Hybrid Cloud via the latest version – Enterprise Manager Cloud Control 13c installed on premises. The main intention is to install an Enterprise Manager Hybrid Cloud agent on our database cloud servers via the hybrid gateway, in the scenario where our company has databases running on premises as well as on the Oracle public cloud, and then to look at hybrid cloud management using the Oracle Enterprise Manager toolset.
In the previous parts of the article series, we completed the pre-setup steps for the hybrid cloud – such as setting up one of our on-premises Enterprise Manager Oracle Management Service (OMS) agents as the hybrid gateway agent, creating SSH keys for the OMS server, and creating a named credential with SSH key credentials for the hybrid cloud. At the same time, we also created an Oracle Database Service (a virtual server with an Oracle database) on the Oracle public cloud.
Next, we completed the installation of the hybrid cloud agent via Oracle Enterprise Manager, which performed a background transfer of the agent software to the destination host. We logged into the on-premises Enterprise Manager console as SYSMAN or a super administrator and drilled down to the Cloud Host home page. On this page, we could see the Enterprise Manager Configuration and performance metrics for the host; these metrics were uploaded by the hybrid cloud agent. And after the database discovery process was completed, the cloud database appeared in the list of Enterprise Manager database targets, and it can now be monitored and managed just like a normal on-premises database.
Next, we compared database configurations by selecting Enterprise | Configuration | Comparison and Drift Management from the Enterprise Manager console, and creating a comparison. We selected the on-premises 12c database “ahuprod.sainath.com” as the Reference Target (Current). In the Compared Targets list, we selected and added the cloud database AHUTEST. On submitting, the results of the configuration comparison job appear in a short space of time, and the differences are displayed. Effectively, you have compared the configuration of a local on-premises database with that of a cloud database. This comparison can be done at the server level as well, and configurations at a certain date and time can be saved as a “gold” configuration to compare to current configurations at regular intervals, to detect configuration drift. Enterprise Manager is also able to enforce the same compliance standards on the Oracle public cloud as well as on premises, which is perfect for a hybrid database setup.
Next, we looked into the cloning of PDBs from on premises to cloud, one of the main features of the hybrid cloud. As part of this process, we checked the patch set level of the cloud database by going to the cloud service console or by moving to the OPatch directory under the Oracle Home on the cloud server, and issuing the command “opatch lsinventory”. This displayed the patches that have been applied on the Oracle Home. Note that if there are any patch conflicts and the patch application on the cloud database fails, you may need to “force apply” the patch, for the patching to complete successfully. After you completed the PSU patch application, you are able to proceed with the actual PDB cloning, since the source and destination CDBs are now at the latest PSU.
We next went through the steps to preserve the agent home when patching the cloud database. This workaround involved creating the file “/var/opt/oracle/patch/files_to_save.ora”. In this file, we added the agent directory (full path) to preserve. Then, the file /var/opt/oracle/patch/dbpatchm.cfg was edited and the line special_files=”no” was changed to special_files=”yes”.
After you followed these steps, the next time you perform any patching from the cloud database patching menu, the agent directory will be preserved in the original location and you will not need to move it back manually after the patching has completed.
Note that due to the dynamic nature of the Oracle database cloud and its continuous evolution, the workaround explained above may no longer be needed if the agent directory is automatically preserved by the cloud database patching process.
Clone to Oracle Cloud
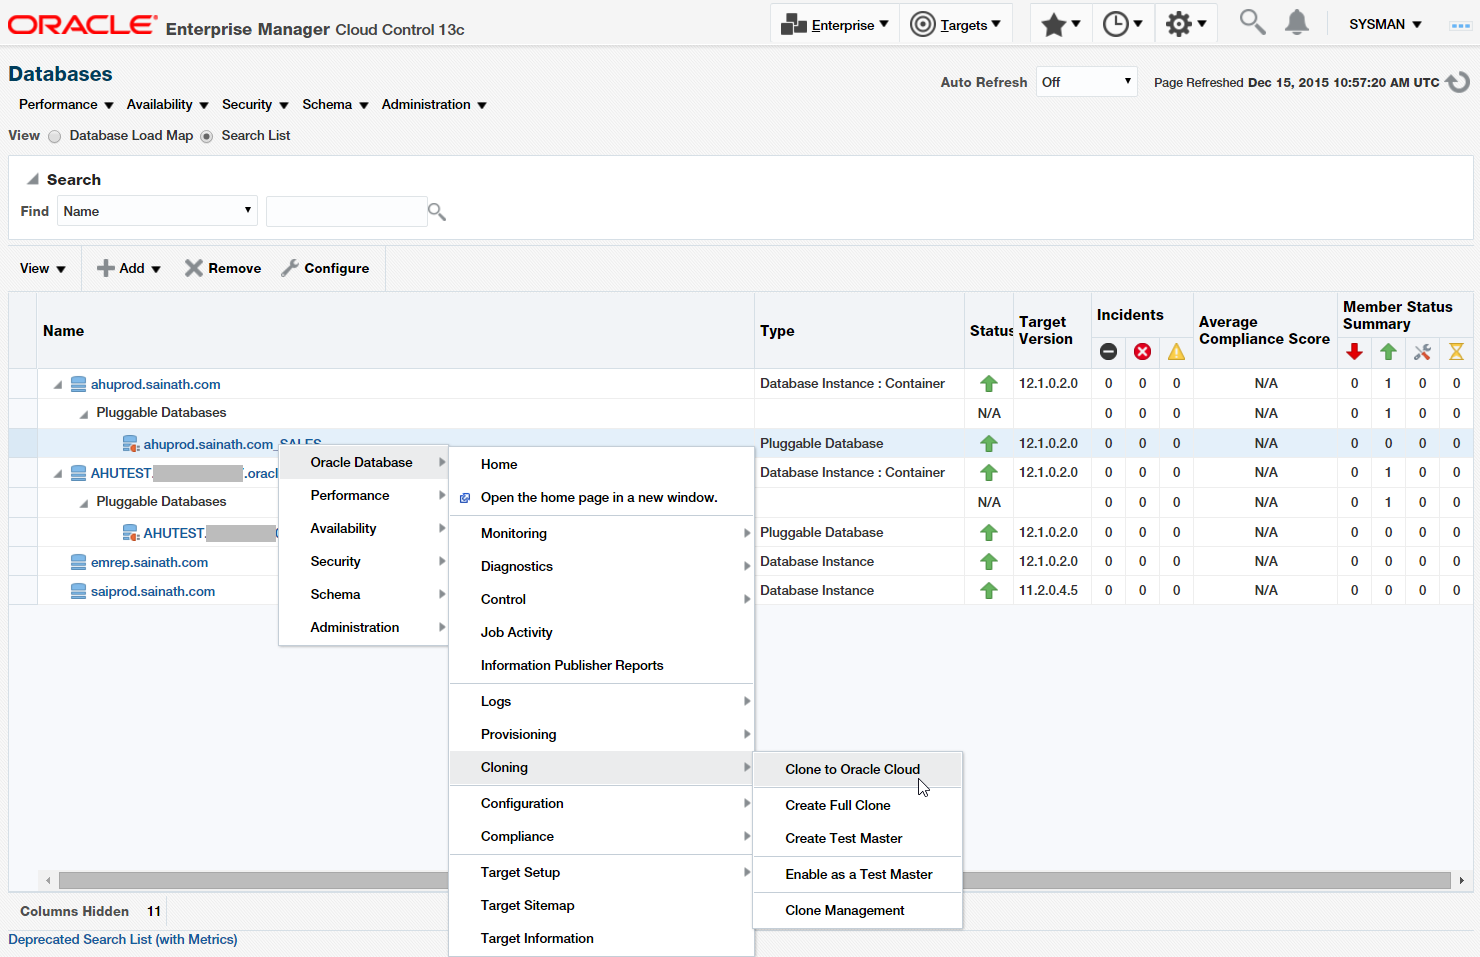
Log in as SYSMAN or a super administrator to the Enterprise Manager console. You can currently see both on-premises databases (ahuprod) and cloud databases (AHUTEST) in a single pane of glass, as can be seen in Targets | Databases (Figure 25).

Figure 25: Clone to Oracle Cloud
As seen in the screenshot, right-click on the on-premises PDB “SALES” which is in the ahuprod CDB. Select Oracle Database | Cloning | Clone to Oracle Cloud.
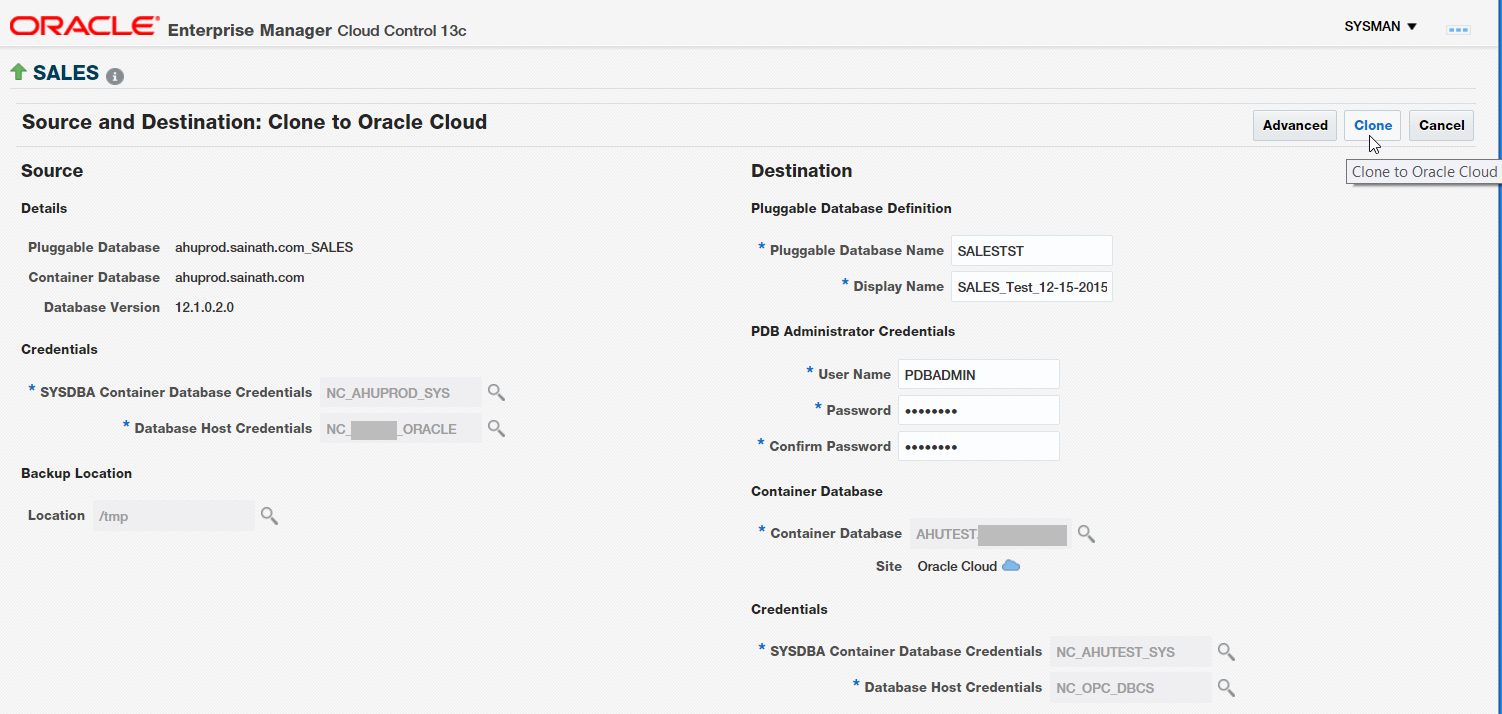
The Source and Destination screen appears (Figure 26).

Figure 26: Source and Destination: Clone to Oracle Cloud
Fill in the credentials for the on-premises side, as well as the cloud side. For the cloud “Database Host credential”, be sure to use the “NC_OPC_DBCS” credential which has been pre-created with the local (OMS) server private and public keys. For the cloud database “SYSDBA Container Database credential”, create a new named credential using the sys password that you specified when creating the cloud database.
Note that if there is an I/O Connection error when testing the new credential, you may need to restart the cloud agent as described below.
$ ssh <IP Address of OPC Server>
Authorized uses only. All activity may be monitored and reported.
[oracle@AHUTESTSERVER ~]$ cd /u01/app/oracle/product/agentHome/agent_13.1.0.0.0/bin
After moving to the bin directory under the cloud agent home, you can stop and start the cloud agent as follows:
[oracle@AHUTESTSERVER bin]$ ./emctl stop agent
Oracle Enterprise Manager Cloud Control 13c Release 1
Copyright (c) 1996, 2015 Oracle Corporation.  All rights reserved.
Stopping agent ... stopped.

[oracle@AHUTESTSERVER bin]$ ./emctl start agent
Oracle Enterprise Manager Cloud Control 13c Release 1
Copyright (c) 1996, 2015 Oracle Corporation.  All rights reserved.
Starting agent ................. started.
Enter the name of the destination PDB on the cloud side as “SALESTST”, since this will be a test pluggable database. Enter a more descriptive Display Name if you wish. Also select a user name and password for the PDB administrator of the new PDB.
We continue in the next part of this article series.
Start the discussion at forums.toadworld.com