In our article series, we are exploring the capabilities of Oracle Enterprise Manager Cloud Control 13c for the private Database as a Service (DBaaS) Cloud – including the setup of such a cloud. In the previous parts, we started going through the setup of the private DBaaS cloud, in particular the configuration of the self service portal. The steps to be followed include the setup of the Enterprise Manager software library, creation of user privileges, creation of roles that can access the pools of database servers, creation of the PaaS infrastructure zones and database pools, specification of quotas for users, creation of service templates, and optionally, the creation of chargeback plans.
After configuring the software library, we set up the Enterprise Manager self update system, and downloaded the latest plug-ins from the external Enterprise Manager store. Specifically we targeted the plug-ins required to enable Database as a Service (DBaaS), such as Oracle Cloud Framework, Oracle Database, Oracle Fusion Middleware, Oracle Virtualization, Oracle Cloud Application, Oracle Storage Management Framework and Oracle Consolidation Planning and Chargeback. We downloaded the latest available plug-in version for each of these, and then deployed the plug-ins appropriately either only on the management server, or on both the management server and the management agent.
Next, we created a Global Host “Named Credential” to access the database servers in the database pool, naming this as NC_DBZONE_ORACLE. We also created a Custom Cloud Role in Enterprise Manager so that we could grant it to the zones or service templates. The new role was named as "SAINATH_SSA_USER_ROLE", and the out-of-box role of EM_SSA_USER was assigned to it.
As the next step, we created a Cloud SSA user named as "SAI_DAS", and assigned to it the previously created Role of "SAINATH_SSA_USER_ROLE ". However, the roles EM_USER and PUBLIC were removed from the list of selected roles, to ensure that the SSA user does not log in to the main Enterprise Manager console, but only to the SSA console – this is important. We can now continue with the PaaS infrastructure zone creation.
Create the PaaS Infrastructure Zone
You are now ready to create a PaaS infrastructure zone. In essence you are defining the infrastructure that will be used for Platform as a Service, which may be for databases, middleware, or even SOA or Oracle Service Bus.
In our case, the Zone we create will be used only for Database as a Service (DBaaS). This includes single instance or multi-instance Oracle Real Application Cluster (RAC) databases, or Schemas, or Pluggable Databases created via self-service.
A PaaS infrastructure zone can contain a group of hosts; these obviously need to be set up as managed hosts in Enterprise Manager; i.e., the Enterprise Manager Agent should have been previously installed on these hosts, and they should have been discovered as targets. Note that each zone can contain homogeneous resources of only one type, for example – hosts with the same operating system (Linux), and the same platform (x86_64).
Log in as SYSMAN or as a Cloud Administrator. Select Enterprise | Cloud | Cloud Home. The Cloud Home page appears.
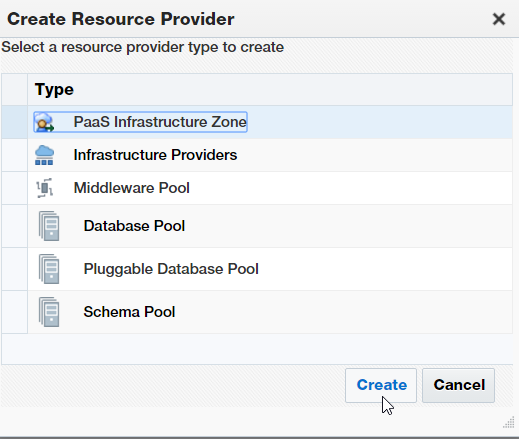
From the Cloud Home menu, select Resource Providers. On this page, you can click on the Create button. This brings up the “Create Resource Provider” window (Figure 9).

Figure 9: Create Resource Provider Window
Select “PaaS Infrastructure Zone”, and click Create. The first step in the wizard to create the zone is displayed (Figure 10).

Figure 10: Create PaaS Infrastructure Zone: First step
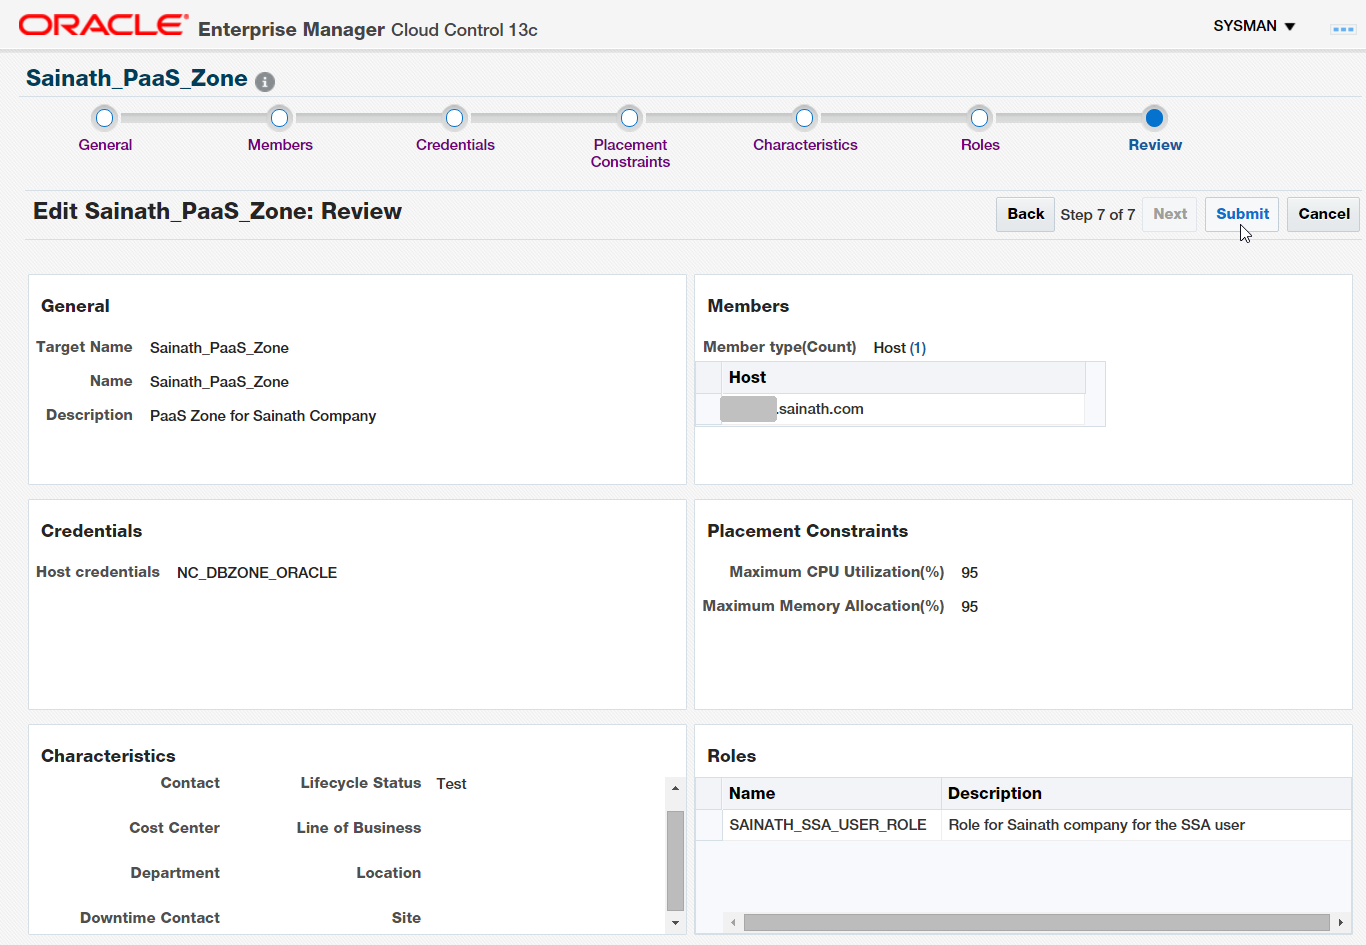
Name the zone as “Sainath_PaaS_Zone” and click on Next. In the second step, add the Members (hosts) that will be part of the PaaS infrastructure zone. You can add a single or multiple hosts. Note, an important point – the hosts that you select cannot be present in more than one PaaS infrastructure zone. If they have already been used in another zone, they will not appear in the selection list.
Move to the next step, and add the Host Credentials to be used for provisioning in this PaaS infrastructure zone. The credentials should be global; i.e., valid across all the member hosts in the zone. We have already created a global host credential named NC_DBZONE_ORACLE which can be used at this stage.
Next, you specify the Placement Constraints. There are two constraints that can be set – Maximum CPU Utilization(%), and Maximum Memory Allocation(%). Both are set to 80% by default. These allow the cloud administrator to set maximum limits of CPU utilization and memory utilization for any member in the zone. As a result, members that are over utilized over these limits will not be used during creation of new services by the SSA user.
On a demo host, you can change the Placement Constraints to be 95% for both the Maximum CPU utilization and Maximum memory allocation instead of the default 80%. This will allow the same host to be used for DBaaS even if there are fewer resources available on the host. On a production host, leave the limits at 80%, or reduce them further as per your company policy so as to prevent overloading.
On the Characteristics step, you can specify the default Target Properties that will be applied to the zone as Enterprise Manager Target properties. The possible properties that can be specified are as follows: Contact, Cost Center, Department, Downtime Contact, Lifecycle Status, Line of Business, Location, and Site. For example, if this is going to be a mission critical or production or test zone, or development or staging, you can specify the Lifecycle Status as the value you want – and all databases created in this zone will have this Enterprise Manager property set to the value you have selected.
The next step is where you specify the roles that can access this zone. In this way, you can restrict access to the zone to a set of users who have been granted these roles.
Assign the SAINATH_SSA_USER_ROLE to the zone. Since the new user SAI_DAS has been assigned this role, SAI_DAS will be able to perform self-service in the zone.
Move to the next step. The Review screen appears (Figure 11). Check the details and click on submit.

Figure 11: Create PaaS Infrastructure Zone: Review
The PaaS infrastructure zone will now be created, and appear in the list of resource providers. We continue the steps in the next part of this article series.
Start the discussion at forums.toadworld.com